Shop for Fuji gear at B&H

Wednesday, October 30, 2013

The Fuji X100S made me a better B&W photographer


So let me share my "secrets" to getting great B&W results from the Fuji X100S with you.


Exploring new directions - Fuji X100S
B&W photography can give your photography a new direction


I started my photography with a cheap plastic camera from a grab bag and a roll of B&W film in the 70's. I must have been 5 or 6 years old at that time. I guess that is where my emotional attachment to B&W photography started.

But when I switched to mainly digital cameras I shot generally in color. This was in big part due to the fact that I did not like the in camera results that the JPG B&W modes produced. And once the color file ended up on my computer, I often just stuck with color.

But since I own the Fuji X100S this has changed! The Fuji X-Cameras create superb color files straight out of the camera. But for the B&W lover in you, Fuji has also created some wonderful B&W filters.

I can see between the lines - Fuji X100S
This reflection would have drowned in a busy color background


My favorite B&W setting on the X100S for most situations are:

- Film simulation: B-R (B&W Red Filter)
- Sharpness: +1
- Highlight Tone: +1
- Shadow Tone: +2
- Noise Reduction: -2

This will give you a fairly contrasty B&W look when exposed correctly.

Late summer day in Copenhagen - Fuji X100S
The lack of color can be visually relaxing


And in case you don't have a lot of experience with B&W photography the Fuji X cameras with EVF or LCD will take you by the hand and guide you to your first successful exposures. When you switch your JPG to B&W you will see a B&W image in the EVF / LCD preview. Now use the exposure compensation dial (in Aperture priority mode) to increase or decrease the exposure and get a more predominant black or white  look.

Remix the World Copenhagen - Fuji X100S
B&W works great for structures and patterns


Through the live preview in the EVF I got this next photo exposed the way I wanted in my first try. It feels like cheating, but the result is what counts! ;)

Shadow mirroring BMX - Fuji X100S
Got this exposed the way I wanted on the first try - and this pose in motion would not have had time for a second try


This is a X100S portrait with my B&W settings plus on board fill flash straight out of the X100S:

Happy Bokeh Friday 11.10.2013 - Fuji X100S
This is a JPG straight out of camera!


If I still want some more contrast in my photo I upload the JPG file to my iPad and do some  quick adjustments - et voilà!

Harbour Landscape B&W - Fuji X100S
The sun flare was visible in the EVF. This way I was able to time it just right when the ship passed underneath it.


Still not sure if you want to deprive your exposures of the color for good? No problem! Set the Fuji X100S to shoot JPG + RAW and the RAW file will contain all of the color information just in case you change your mind later. The EVF will still show the B&W preview. Feels like cheating again? Don't worry! It is all about the images that come out of the camera :)

Happy Hamburg Bokeh Friday 27.09.2013 - Fuji X100S
Be adventurous and try to some B&W photos with your Fuji X-Camera


 I have to admit that I sometimes shoot JPG + RAW and end up using the RAW file to convert it into a B&W JPG in post processing. I will do this when I shoot in very contrasty situations and might need to recover some highlights later. The other occasion is when I shoot close to or at ISO 6400. I have set the Noise Reduction to -2 but at those high ISO the X100S tends to smooth out a bit too much details despite the NR -2 setting.


Night portrait at ISO 6400 and 19mm - Fuji X100S
At ISO 6400 I prefer RAW to keep more details


So, are you ready to give it a try? Then why not just save the B&W settings as one of your custom settings in your X100S for those occasions when you feel like shooting Monochrome :)

Copenhagen - Bike and Run City - Fuji X100S
The Fuji X100S is the perfect B&W camera for me!


If you have any further questions or want to share your Fuji X B&W experiences just leave a comment below, Twitter me @HamburgCam or visit my Homepage at www.MarcoLarousse.com

And if you liked my post I am always happy if you spread the word and retweet, like or google +1 it :-)

Monday, July 15, 2013

Fuji X100S Review - Is it worth to upgrade from the classic X100?

After a 2 year production cycle, Fujifilm upgraded the revolutionary X100 and introduced the X100S. The X100 was the reason I bought my first digital Fuji camera a little over 2 years ago and it has turned me into a loyal customer, also buying the X10 and X-Pro 1. The X100 was also the first camera that I preordered without ever holding it in my hands or reading a single review (there were no reviews at the time I preordered).

The X100S is my daily companion - even in bad weather
The X100S is my daily companion - even in bad weather there are scenes to capture

But now the question for me and countless other classic X100 photographers was: Should I upgrade to the X100S?

Fujifilm introduced the revolutionary hybrid viewfinder with the X100 and gave the camera an external control layout of a classic film camera with aperture, shutter time and exposure compensation that can be controlled blindfolded with your finger tips.

But the X100 was not without flaws. While the image quality was stunningly wonderful even in Firmware 1.0, some of the ergonomics were... hmmm... let's say "challenging".

The original FW was lacking some streamlining in the menu and the minimum focus distance before having to switch to Macro mode was almost a deal breaker for me. Especially since it requited the photographer to push buttons 3 times before the Macro mode was activated or deactivated.
But most of these issues were fixed with continuous FW updates and the AF plus MF quality and speed was improved over time, too.

Is it worth upgrading to the X100S
I'm already owning the X-Pro 1 and classic X100 - so is it worth buying the X100S?

So why should I upgrade if the X100 is a good camera with the current FW? Well, because the X100s is simply better at everything!

There were certain things that Fuji was not able to fix in FW on the classic X100 as they were hardware related. The X100 and the X100S exterior are almost identical but the trained X100 photographer will happily notice the subtle but important changes that Fuji made.

The first thing that I appreciate is the physically raised "menu" and "OK" button. You won't have to operate this important button with your fingernails any more. Secondly, the 3 position focus mode slider now has the most used modes at the easy to slide to top and bottom position (Manual focus and AF-S standard mode) while the least used mode for me (AF-C continuous that can only be used with center focus point) now sits at the fiddly middle position (where formerly the most used AF-S was placed). The AF-Point selection and Drive buttons also swapped places. This enables you to move the AF-Point with one finger while staying glued to the viewfinder. This fantastic improvement was also introduced in the 2.05 X-Pro 1 FW (1.06 on X-E1) update via Fn button.
Lastly, the RAW button turned into the Q-Menu (Quick menu overview) button that is known and loved from the X-Pro 1 / X-E1and X10 but did not make it to the original X100, yet.

Just these ergonomic changes could be reason enough for the enthusiast X100 photographer to upgrade. But wait, there is more! Fuji lists 70 improvements that have been implemented in comparison to the previous version of the X100. OK, let's make it 69 as I find the mere attachment of the "S" badge not to be a real usability enhancement ;)

I will not go through the whole list of remaining improvements but rather tell you what I find extremely helpful from a daily usability point of view:

The single biggest improvement for me is the reduction of the minimum focus distance before having to switch to Macro mode. It has been reduced by 40% down to 50cm (20in) from 80cm (31in) on the previous version. I was constantly in the close range for portraits and having to switch to Macro was annoying and slowed down the AF locking process considerably.

AF with improved close focus distance
The X100S has an improved AF close focus distance before having to switch to Macro mode - high five for that!

Next on the list to mention is the improved AF and MF speed. The contrast AF now gets supported by phase detection pixel on the sensor to speed up the AF in certain well lit situations. And when the phase detection pixel take control the AF locks very, very fast. If the contrast detection takes over, the AF speed feels about as fast as the AF speed on the classic X100 with current FW.

So how can one make the phase detection pixel to always be in charge? Well, Fuji claims that you will need a decent amount of light. Then you need to use the focus points around the center as these PD pixel are only covering 40% of the sensor around the center.

I did as Fuji told me, but I still find it very hard to control if PD or CD AF will be used to lock focus. Even if I aim the focus point at the same subject and try to lock AF repeatedly with half pressed shutter, it will sometimes pump (CD AF) and sometimes be instant (PD AF) to lock focus. This and an improved AF lock rate in backlit situations are two of the few areas where I hope for improvements in future FW updates. When you have a blazing fast PD AF it should be used as often as possible. But aside from this wish I should add that even right now this is the fastest and most reliable AF of the current APS-C size sensor Fuji X-Cameras.

And if you struggle with any of your Fuji X cameras AF, read this article that I wrote about maximizing your AF results with Fuji X cameras

The improved X100S AF in action

And thanks to a higher resolution EVF, focus peaking and the now ambient light independent manual focus system, this is currently also the best manual focus Fuji X-Camera (until the FW 3.0 update for the X-Pro 1 and X-E1 on July 24, 2013 anyway).

Operating Speed:
The X100S also operates faster than the classic X100. There is no noticeable shutter lag and switching settings in menu is instant. If maximum operating speed is important to you, then switch off all energy saving- and switch on all performance improving features. What also helps is when you use the fastest UHS-I SDHC cards. I use the 16GB SanDisk Extreme 95MB/s and I'm very happy with the speed they write my RAW + JPG files.

 No noticeable shutter lag = perfectly timed captures
 No noticeable shutter lag = perfectly timed captures

Power consumption and batteries:
But with all energy saving turned off, I highly recommend that you buy at least one, or better yet, two spare batteries for your X100S. There have been situations where I got less than 350 images out of one charge with lots of reviewing and constant EVF use. And since my first experiences with two off brand batteries were so negative (they would not physically fit into the X100 battery compartment without getting stuck) I now only buy the original Fuji batteries.

Landscape photography with an urban touch
Just a visual reminder to take extra batteries with you for long photo walks with your X100S ;-)

Charging:
Talking about batteries, the charger that comes with the X100S now doesn't have a loose adapter part (to hold the battery in place) any more. After loosing this part on my X100 charger on a trip, I glued the replacement part permanently to the charger. Now Fuji attached this part permanently.

But what also needed improving was the charging time for empty batteries. An empty X100(S) battery will need 3.5 to 4 hours to charge completely! And unfortunately this has not changed with the X100S charger :-(

This becomes really annoying when you are on a photo trip and come back to the hotel at night with 2-3 empty batteries. I end up setting my alarm to wake up after 4 hours to switch batteries in the charger, so that I have at least 2 fully charged batteries for the next day. If anyone knows a faster charger for the X100 battery, please let me know! And no, a second charger is not an option. Traveling light is one of the reasons why I switched from DSLR to mirrorless for the majority of my work.

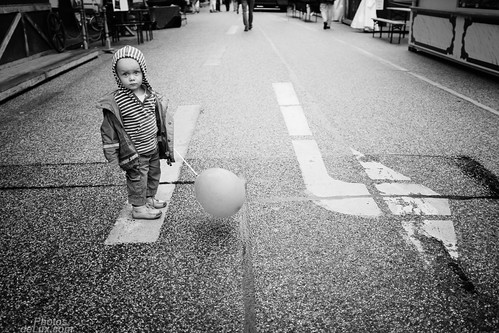
Raw street photography

Image Quality
The biggest change concerning the image quality between the X100 and the X100S is the switch from a 12 MPix bayer array sensor to the 16 MPix X-Trans II sensor (this is an updated version of the X-Pro 1 & X-E1 X-Trans sensor.)
The original X100 certainly has an outstanding image quality and color rendition and still performs incredibly well today. But the extra 4 MPix and new sensor technology of the X100S are nice for extra cropping and ISO headroom. From looking at my images EXIF data I would say that the X100S has a 1 stop ISO noise advantage over the X100. This becomes quite visible at ISO 3200 and 6400. But I also have the feeling that the ISO sensitivity on the X100S is about 1/2 of a f-stop less sensitive. This leads to slightly longer shutter times at equal exposure situations. But over all there is still a bit of a gain in favor of the X100S and the "noise" of the X-Trans sensor looks very film grain like.

@ the barbershop - Fuji X100s
I'm 100% satisfied with image and detail quality that I get from the X100S!

The JPG color rendition is also a bit different between these two generations of X100 cameras. I have noticed this when I first started using the X-Pro 1 with the X-Trans sensor compared to the X10 and X100. This difference is mostly visible in yellow and green parts of the image. The X10 and X100 are very similar to each other while the X-Pro1 and X100S are more of a match to each other. Yet, if you don't do a direct A-B comparison, you will not notice this subtle difference in tonal rendition. And the out of camera JPG image look is beautiful from both sensors!

Natural skin colors and an analog  film like look are one of the strength of Fuji X cameras
 Natural skin colors and an analog  film like look are one of the strength of Fuji X cameras

If you enjoy to give your photos a look of other analog film types than what the Fuji X-Cameras already offer internally, take a look at the products from VSCO. They offer their 3 film packs for LR and Aperture now with support for Fuji X100, X100s, X-E1 and X-Pro 1 Raw files.

A little VSCO Film adjustment in LightRoom gave the X100Simage this look
 A little VSCO Film adjustment in LightRoom gave the image this look

The lens picks up some flare and this is identical to the lens on the original X100. Hence, I would buy the lens hood with adapter for two reasons:

1. To control flare.

2. To have a filter thread for the use of filter or simply to plug in a standard lens cap (49mm filter and lens cap for the adapter without the lens hood and a 52mm lens cap for use with the lens hood attached - you can see this on the second photo from the top). And do get the lens caps with the pinch release in the middle of the cap!

Street Portrait - Fuji X100s
 The lens hood saved me from flare in this backlit image

My settings:
The X100S has turned into my every day take along camera. It is my street, portrait and city/landscape tool. And, I use it 95% of the time as a B&W camera! I set the camera to record JPG + RAW and set the JPG to be captured in BW + Red Filter. This way the EVF and the review image in the EVF & OVF will show a B&W image which is closest to the way I would process it. The RAW file still contains the color information and will be rendered as a color image in my LightRoom collection, next to the B&W JPG image.

I find that seeing a scene in B&W is less distracting and lets me focus more intensely on the subject and situation of the scene.

The Brick Wall test
Lens distortion is well controlled in JPG images and easily adjusted on RAW with a +5 setting in LightRoom


These are my preferred every day settings when I'm out with the X100S:

- Fn = ND Filter (heavily used in bright conditions to overcome the f2 & 1/1000s limit)
- RAW + JPG
- ISO: Auto 6400 at 1/100s (I'd rather take a bit more noise than motion blur)
- Film simulation: B-R (B&W Red Filter)
- Sharpness: +1
- Highlight Tone: 0
- Shadow Tone: +1
- Noise Reduction: -2
- MF Assist: Max
- High Performance Mode: On
- Power Saving: Off
- Review Time: 0.5 S


I'd say that even with a fixed 35mm equivalent field of view (to a 35mm film camera) the Fuji X100 and X100S cameras are very versatile:

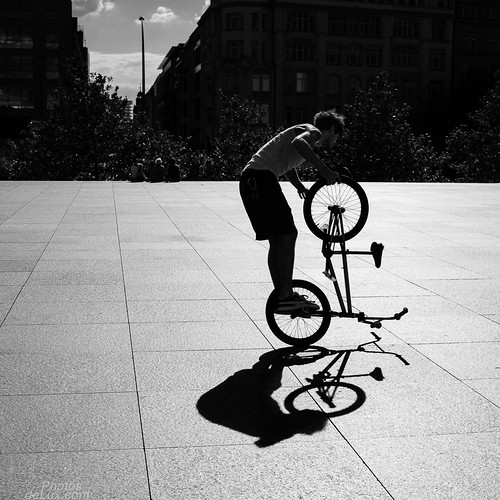
Reportage photography:
Reportage photography X100S


Portrait photography:
Portrait photography with X100S


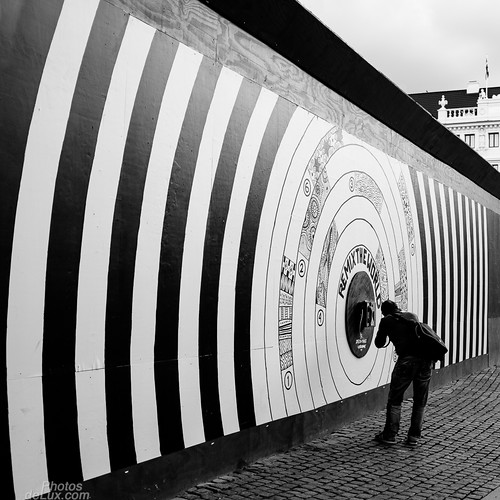
Architecture photography:
Architecture photography with X100S


Landscape photography (with VSCO Filmpack Filter applied):
Landscape photography with VSCO Filmpack Filter applied


My Résumé:
The original X100 was a revolutionary camera with great image quality and a few quirks, but most of them were taken care of in FW updates. Still, after using the original X100 for 2 years my first 24h with the X100S convinced me that this is the camera I have been waiting for! And at first I didn't even want to upgrade as the image quality of the X100 is still very, very good.

But it seems like all of my suggestions to improve the usability of the original X100 were implemented. Someone at Fuji must be either reading my mind or reading my blog and forum posts ;-) The X100S is truly a worthy successor with improvements in almost all aspects - making my daily work with this camera a pleasure.

When I'm out with the X100S I don't have to think about how to operate the camera. I can simply concentrate on framing my shot and evaluating the scene. I operate the aperture, shutter time and exposure compensation directly on the dedicated wheels without taking my eye off the viewfinder. And I'm get an instant 0.5 second quick review image to check if I got the shot the way I intended it. If the X100S didn't already exist one would have to invent it! :-)

I think that if Henri Cartier Bresson would still be alive and in the market for a mirrorless camera, he would probably look very closely at the Fujifilm X100S - it's that good of a street photography tool.

Add translates to: "How to take good photos"

To finally answer the question if the X100s is worth the upgrade from the X100? After using this camera daily for more than 3 month with roughly 5000 photos taken, I can answer this question with a big "YES!" for myself. So if you are still in doubt if this upgrade is worth it for you, go to your camera store and give it a try! This camera might also be an alternative for people who are interested in the Fujinon XF 23mm f1.4 lens for their X-Pro 1 or X-E1. Besides that the XF 23mm f1.4 lens is not released at the time I'm writing this, the X100S can also be seen as a 23mm f2 lens with a fine camera attached. And it would make a nice back up camera, too :)

And it is also worth a second look for people who had operating issues with the classic X100.
But I must also add that this does not make the classic X100 an obsolete camera. If you don't want to spend the new price on a X100S and don't mind the minor operating issues that I had with the classic X100 (mainly close focus distance before having to switch to Macro, MF in low light and two handed AF point selection) it is still a camera with wonderful image quality at a very interesting used price. And take a look at the Fuji X photographers who still use the original X100 and the stunning images that they create with it. Only the difference in image quality from the new sensor would not have been my reason to upgrade...

Probably one of my last Fuji X100 photos
One of my last photos taken with the classic Fuji X100

If you have any further questions leave a comment below, Twitter me @HamburgCam or visit my Homepage at www.MarcoLarousse.com

And if you liked my post I am always happy if you spread the word and retweet, like or google +1 it :-) 

Tuesday, April 16, 2013

The Fujinon XF 14mm review - the best Leica lens Fuji ever built ;)


I have spent a few weeks with the new Fuji XF 14mm f2.8 R lens. I had heard good things about it, yet it was not love at first sight for me.

Testing the Fujinon XF 14mm f2.8 R in the real world
Testing the Fujinon XF 14mm f2.8 R in the real world...

And that is not to say that it is not a pretty lens. It is very attractive looking and the markings for the DOF indicator clearly separates it from the rest of the current Fujinon XF lens lineup.


Fujinon XF 14mm f2.8 - my X-Pro 1's birthday present
Fujinon XF 14mm f2.8 R lens


But the timing for getting the XF 14mm was a bit off for me. I had just finished some intense testing of the Samyang 8mm f2.8 fisheye and absolutely loved the 180° field of view and image quality. And my main lens for the X-Pro 1 has been the light and very compact XF 18mm f2 for the past year. Compared to the XF 18mm the XF 14mm is big (41mm/1.6" vs. 58mm/2.28") and heavy (116g/0.26lb vs. 235g/0.52lb).


Fujinon XF 18mm f2 vs. XF 14mm f2.8

Will I be using the XF 14mm enough to justify the purchase? After all it is currently the most expensive X-Mount lens made by Fuji. And in the end it is only 4mm wider than the XF 18mm and even one stop slower.

Anyway, I now had the lens in my hands and did what I always do when I get new gear – I attached it to the camera, emptied my camera bag and locked all other lenses and camera bodies into my closet. The best way to get familiar with new gear fast is to use it intensely and exclusively.

So I went out on my first stroll with the new lens. But when I stepped out of my door I felt an unfamiliar strong pull on my camera strap (which I lug across my shoulder like a messenger bag). Not only is the XF 14mm heavier, it also sticks out longer to change the weight balance a bit into the “uncomfortable” department. Additionally, I do not like the style of lenshood that the XF 14mm requires. The XF 18mm and 35mm lenses have small and unobtrusive square lens hoods. But this is the Tulip style lens hood that draws much more attention and makes the camera look bigger than it is – not good for a stealthy aspiring street photographer.


Fujinon XF 14mm f2.8 vs. XF 18mm f2 with lens hoods

The 14mm lens will equal the field of view of a 21mm lens on a full frame camera. So the 90° field of view should be perfect for landscape and architecture. And while I have gotten really used to the 27mm full frame equivalent field of view of the XF 18mm lens, I could clearly see the added benefit of a 21mm equivalent field of view of the XF 14mm lens. You can get closer and still get everything in the frame.


Dampfschiff St. Georg Hamburg - Fujinon XF 14mm - Fuji X-Pro 1
Wide angle lenses allow you to get closer to avoid having other photographers / tourists in your picture ;)

Hamburg Telemichel und Messehallen - Fujinon XF 14mm f2.8 - Fuji X-Pro 1
Hamburg Telemichel and Messehallen - Fujinon XF 14mm f2.8 - Fuji X-Pro 1

A quick check on the MacBook Air brought the first surprise: It does not show distortion - not even on the RAW file! Wow! For a wide angle lens like this, I’m impressed!

I also made myself familiar with the manual focus mechanism of this lens and it works pretty much the way I would have wanted it to. It is pretty comfortable to switch into the MF mode directly when you pull the focus ring back. No need to set the MF switch manually. And it goes right back to AF when you push the focus ring back to the forward position. Very smart! But it comes with one drawback: You can not automatically prefocus with the AF-L button in manual mode. The AF mechanism seems to be completely decoupled from the gears when in MF mode. And when in AF mode you can’t turn the MF focus ring as it is locked.


Elbtunnel - Underneath the Elbe River - Fujinon XF 14mm f2.8 - Fuji X-Pro 1
 Fujinon XF 14mm f2.8 @ f4 ISO 3200

Car Elevator Elbtunnel - Fujinon XF 14mm - Fuji X-Pro 1

Zone focusing has worked well for me with the XF 14mm and it raises the question, why many modern lenses don’t get these useful markings any more?


Hamburg Frühlings DOM 2013 - Fujinon XF 14mm - Fuji X-Pro 1
14mm gave the perfect 90° angle to capture this chairoplane

The manual focus is still focus by wire on the XF 14mm but it is the best feel of all the XF lenses I have tried so far.

Flying on the chairoplane - Fujinon XF 14mm f2.8 - Fuji X-Pro 1
 Zone focus with DOF indicator on the lens worked well

The autofocus feels about as fast as the one in the XF 35mm and not quite as snappy as the XF 18mm. The 58mm filter thread is a bit unfortunate compared to the 52mm of the XF 18mm and 35mm, but physics has it’s laws about front element size...


Rollercoaster panning - Fujinon XF 14mm f2.8 - Fuji X-Pro 1
Roller coaster panning - Fujinon XF 14mm f2.8 - Fuji X-Pro 1

The lens handles flare pretty good for a 14mm wide angle lens. It shares the same lens hood with the XF18-55mm zoom lens. That is convenient for people who own both lenses and only want to bring one lens hood. But it also raises the question if the zoom lens gets the maximum sun protection on the wide end if the cover area is enough for an even wider 14mm vs. 18mm lens?

Backlight and flare test with the Fuji XF 14mm lens - Fuji X-Pro 1

This brings me to the image quality. As always I do not test my gear in lab conditions. Others who are much better at this already do plenty of these tests. For me it is important to see how the gear behaves in normal shooting situations. And here the lens performs stunningly well! Sharpness and contrast are already very good wide open at f2.8 and gets even better (especially in the corners) at f4 - f5.6 range. I hardly shoot beyond f5.6 if I don’t have to. But I tried some daytime long exposures with a ND1000 filter and aperture up to f16 to get a slow shutter time. IQ is still good but you loose some sharpness due to diffraction beyond f11 – like with most other lenses, too.


Hamburg Alster Architecture - Fujinon XF 14mm f2.8 - Fuji X-Pro 1
 XF 14mm long exposure: 15s - f16

Space Odyssey 2013 - Fujinon XF 14mm - Fuji X-Pro 1
XF 14mm long exposure: 15s - f16

There is a bit of vignetting wide open at f2.8 (corrected on the JPG files, visible on RAW) and it decreases slowly when you stop down. Nothing out of the ordinary for a wide angle lens, though. But the vignetting has not spoiled any of my images so far.

Hamburg Alster Fountain Rainbow - Fujinon XF 14mm - Fuji X-Pro 1
Hamburg Alster Fountain Rainbow - I even added some extra vignetting on the top of this image!


If you have followed my blog, Flickr stream and Twitter feed long enough, you know how important bokeh is to me. So how does the XF 14mm handle the out of focus blur?


Take Courage! - Fujinon XF 14mm - Fuji X-Pro 1
 Take Courage! Get closer than you normally would to get a smooth bokeh

Hamburg Bokeh Sightseeing with the giraffe, Fuji XF 14mm and Fuji X-Pro 1
My Hamburg Bokeh Sightsseing series benefits from the XF 14mm wide angle lens

After tons of photos in all different lighting situations I am nothing short of impressed. I hear a few complaints about the price of this lens. And at a MSRP of EUR 899,- / USD 899,- it does not generally appear to be a bargain for a Fujinon XF lens at first sight. But imagine you could buy a Leica 14mm f2.8 lens for this price – you would not think twice. And from my image quality point of view I would say that the XF 14mm is the most Leica like wide angle lens I have tried so far.
If you take a look at it from this point of view the lens is almost a bargain! :)

Positive:
+ Great image quality, color and contrast
+ DOF scale on the lens
+ Handles flare well
+ Value for money!

Neutral:
o Normal wide angle vignetting
o 58mm filter thread vs. 52mm on XF18 and 35mm
o 1 f-stop slower than the XF 18mm lens

Negative:
- Bulky lens hood (also obstructs OVF on X-Pro 1 quite a bit)
- A bit too big and heavy for my taste

If you have any further questions leave a comment below, Twitter me @HamburgCam or visit my Homepage at www.MarcoLarousse.com

And if you liked my post I am always happy if you spread the word and retweet, like or google +1 it :-) 

Wednesday, March 13, 2013

Ultra Wide Angle Fisheye Lens on the Fuji X-Pro 1 - Samyang 8mm f2.8 XF

APS-C cameras used to have a few drawbacks compared to full frame cameras:

1. The smaller sensor produced noisier photos at high ISO and lacked dynamic range.

2. It is more difficult to produce a photo with shallow depth of field.

3. Due to the crop factor it was difficult to get a good quality ultra wide angle lens with a larger field of view than 120°

The introduction of the Fuji X-Pro 1 solved No. 1. for me right away. And while No. 2 is based on a law of optics I have found my way of dealing with it by changing my approach on taking those kind of images.

That left No. 3 still to be desired.

I have a Canon EF 15mm fisheye lens for my full frame camera, but when I connect it with an EOS-XF adapter to my X-Pro 1 the APS-C sensor size reduces the effective field of view to about 85° - or the equivalent FOV of a 23mm lens on a full frame camera.  Fuji’s currently widest XF lens is the XF 14mm f2.8 with an effective field of view of 90° (equivalent FOV of a 21mm lens on a full frame camera) - and while this lens seems to be very impressive (it is my next review on the list), I had to look elsewhere to go much wider than 90°. My research led me to the Samyang 8mm f2.8 fisheye lens for the Fuji XF mount. The lens promises an effective field of view of 180°! Samyang is a Korean manufacturer and this particular lens is also branded as Rokinon, Bower and Walimex 8mm f2.8 lens and also available for different camera manufacturer mounts.

Throughout my photography career I have had mixed results with 3rd party lenses and ended up staying with the known “big” brands from the respective camera manufacturer. But due to the lack of alternatives and a reasonable street price of around EUR 300 in Europe or USD 300 in the US, I wanted to give the Samyang a try.

Samyang 8mm f2.8 XF for Fuji X-Pro 1
Samyang 8mm f2.8 XF attached to my Fuji X-Pro 1


After all, a fisheye lens is a specialty lens that should not be overused or you (and your audience) will soon get bored/annoyed by the effect it produces. And I can almost promise you that you will get tired of it after you see all the images in this post, too - so always use a fisheye lens wisely ;)

When the Samyang 8mm f2.8 lens arrived I was surprised! It is small yet very heavy. Compared to the Fuji XF 18mm f2 the Samyang is about the same size but a bit over twice as heavy (116g/4.1oz to 260g/9.2oz)! What did they use to build it – depleted uranium? But Fuji’s XF lenses are exceptionally well and light build and compared to the Canon EF 15mm f2.8 fisheye the Samyang is actually a bit lighter.

The Samyang’s aperture and focus rings are rather stiff even when compared to my legacy Olympus OM lenses. But this also gives me the feeling that this lens has a solid build quality and I will most likely get used to it over time. The lens is all manual and has no electronic intelligence that get’s passed on to the camera body. That has the big disadvantage that your Exif files will not contain any info about the lens and aperture. Luckily you can add a 8mm custom profile to the Fuji X-Pro 1 and if you activate it before you use the Samyang lens, the Exif will at least show 8mm. But the aperture will always read “f1”. And while you're in the Fuji's menus make sure that you activate the "shoot without lens" option, as the Fuji will not know that a lens is attached without electronic feedback from the lens.

Enough talk about the specs and feel, let’s see what this lens can do! I went out a few times and used this lens in situations where I think that a fisheye can work its magic.

All images were captured in RAW and processed and converted in LightRoom 4.3 with the "old" Adobe RAW converter. The new converter in version 4.4 could improve the image quality.

And as always click on the image to get the option for a bigger version in my Flickr stream.


Bad weather forced my to do most of my tests indoors so I started with some composition tests at the "Wandelhalle" in Hamburg's central station. On the first image I chose a vertical pano orientation as I wanted the clock as an eye catcher in the frame while giving the viewer an idea how the whole structure looked like:

Hamburg Hauptbahnhof Wandelhalle 8mm Fisheye - Fuji X-Pro 1
Vertical worked well here - 180° cramed in one photo :)


Just a few steps from the previous location I took this picture by pointing the camera up and aiming in horizontal orientation at the ceiling. Adding a stronger tone curve gives this image an even more dramatic look - looks a bit like an old factory:

Wandelhalle Hamburg Hauptbahnhof 8mm Fisheye - Fuji X-Pro 1
This angle of view created a totally different look of the same location


And finally I took an image of the station entrance pointing the lens straight up at the ceiling:

Wandelhalle Hamburg Hauptbahnhof with 8mm Fisheye - Fuji X-Pro 1
You need to take your time to align the framing carefully


After testing the versatility of this lens to create different looks in the same location, let's have a brief look at the sharpness in the next sample. I took this image in low light at f2.8 in a subway station and cut it close to a 2:1 aspect ratio to give it a panorama look. This is another advantage of having a 180° field of view - you get an instant one shot panorama :)

U-Bahn Station Jungfernstieg U4 - Fuji X-Pro 1
Cutting off some of the top and bottom of this frame creates a panorama look


 Let's get closer to the center of the frame. Remember this is at f2.8 and ISO 800 and 1/30s exposure. There may be slight motion blur in people but overall this is pretty good:

U-Bahn Station Jungfernstieg U4 - Crop - Fuji X-Pro 1
I am really happy with the results at f2.8 in this low light situation


Not wanting to turn this blog post into a pixel peeping competition let me just say this about sharpness, contrast and color rendition from my experience so far. Considering that it's a fisheye lens for a reasonable price I am astonished how well this lens does! At f2.8 it is perfectly usable and at f4-5.6 it leaves nothing for me to be desired in a fisheye lens. The edges are a bit softer the further you get towards the corners and there is some vignetting when shooting this lens wide open, but this should not be a surprise to anyone who has some experience with wide and ultra wide angle lenses.

U-Bahn Überseequartier with 8mm Fisheye - Fuji X-Pro 1
At 180° you get more info into your images than the human eyes can normally see (about 120° with peripheral vision)


At f5.6 the corners are very sharp for a fisheye lens. And if you set it to f5.6 and a focus distance of 2m (6ft) you get a sharp focus zone from about 0,5m (2ft) to infinity.

Time Tunnel - Samyang 8mm f2.8 - Fuji X-Pro 1
This is one of my favorite wide angle subjects shot at f5.6


At 180° field of view you will often have light sources, like the sun, shining directly into the lens. The Samyang 8mm f2.8 has a permanent lenshood. But that is just large enough not to show up in the frame. And the convex outward pointing front element of the lens is easily exposed directly into a light source. So inevitably flare becomes an issue. And as for most wide angle lenses the Samyang 8mm is not immune to flare. Depending on the angle the light enters and the aperture chosen (the higher the f-stop the stronger the flare and aperture blade diamonds can show up) the stronger the flare will be visible. Yet, in this sample image I only had to stamp out two spots to get rid of the most visible (unwanted) flare:

IBA_Hamburg Komm_Rüber Sprung - 8mm fisheye - Fuji X-Pro 1
Shooting into the sun at f5.6 - I added a vignette in post


And it is a very similar situation with chromatic aberrations - only that they tend to be stronger when shooting at wide open aperture. The Samyang shows some chromatic aberrations in back light situations around fine structures, but it is very low and very easy to fix in LightRoom 4. The Canon EF 15mm fisheye on the other hand is a CA nightmare on my full frame DSLR!

X-Pro 1 with Samyang 8mm f2.8 XF Fisheye side view
The Samyang lacks DOF markings on the lens and its shortness introduces problems


So far I am very positive about this lens. But there are also a few problems that I encountered during the past week of intensive use. For one this is a fully manual lens like we used to have them before AF was invented. And during that time it was common to add a depth of field scale to the lens. This way you could easily prefocus to a distance and an f-stop that would deliver a sufficiently large DOF for your intended use. The Samyang does not have such a DOF scale and IMHO the person responsible for this omission should not get any dessert in the Samyang cafeteria for at least one year ;)

Secondly, and this really turned into a challenge for me, the lens is too short. How can that be a bad thing? Well, when packing and transporting your gear it is a big advantage. But when you hold your camera in one hand and use the other hand to support the lens while operating the focus ring, you will most likely end up unintentionally capturing your fingers very often! For me as a right handed person the fingers from my left hand (holding the lens) appeared many times in the bottom right corner of the images!

I will have to find a different grip when using this lens on the Fuji X-Pro 1. Shooting and aligning a fisheye lens correctly is challenging enough that I don't have time to check the corners of the frame all the time and it might mess up my carefully composed framing...


Sprinkenhof Fisheye view 8mm Samyang f2.8 - Fuji X-Pro 1
Perfect framing is essential for these kind of photos - better activate the "grid view" in the EVF


This brings me to my last and one of my favorite Samyang 8mm f2.8 image for this post - the new U4 Überseequartier subway station in the Hamburg HafenCity:

U4 Station Überseequartier -  8mm Samyang Fisheye - Fuji X-Pro 1
An 8mm fisheye lens is made for this location - U4 Überseequartier Hamburg


My conclusion:

Positive:
+ It's sharp at f2.8 and gets better up to f5.6 (especially corners)
+ It produces good color and contrast
+ It's solid build and small
+ Chromatic aberrations and flare are very controllable for a fisheye lens
+ Very reasonable price for what you get

Neutral:
o The aperture and focus ring are a bit stiff
o The lens is quite heavy for its size
o The amount of Vignetting appears to be normal for a fisheye lens
o Aperture is changed in 1/2 f-stops instead of 1/3 f-stops

Negative:
- There are no depth of field markings on the lens! Why not???
-  No lens information (lens type, f-stop) is passed on to the camera (custom set it to 8mm in camera!)
- Attached to the X-Pro 1 the lens is very short and it is hard to hold (support) the lens without capturing part of your fingers in the corner of the frame.
- The minimum focus distance starts at 0.3m (1ft). At that distance a 8mm lens closeup shots doesn't look very close at all and it can't produce this special funny perspective that is unique to some UWA lenses.


At first I was a bit sceptical about buying a "new" third party lens for my Fuji X-Pro 1. But the fairly low price, lack of a Fuji equivalent focal length and the fact that this is not an every day lens made the risk of ordering it a bit more manageable.

After a week of intensive testing I am nothing short of impressed with the value that this lens offers and if you have been wanting a fisheye lens for your Fuji X-Mount camera, the Samyang 8mm f2.8 is certainly worth a closer look.


If you have any further questions leave a comment below or Twitter me @HamburgCam

And if you liked my post I am always happy if you spread the word and retweet, like or google +1 it :-)